In the past few years chatbots have become immensely popular. In fact, statistics indicate that by the end of last year 80% of companies were using chatbots and 50% were planning to invest more in chatbots moving forward. This automated method of customer support has been a game changer for many organizations in terms of streamlining operations and saving resources. Chatbots also fit nicely into an automated inbound marketing strategy, which we’ll discuss below
Creating a chatbot of your own has never been simpler. Here at Cyberclick, we recommend HubSpot's Chatflows. This user-friendly, intuitive tool integrates seamlessly with Hubspot CRM and there’s even a free version if you’d like to give it a test drive.
Here’s our step by step guide to creating a chatbot in HubSpot.

How to Create a Free ChatBot in HubSpot
1. Connect a Chat Channel
The first step in creating a chatbot using HubSpot is to connect your chat channel to the conversations inbox. If you’re working with a website that isn’t hosted by HubSpot then you’ll also need to add a tracking code to external pages.
Next, log into HubSpot and click on Conversations > Chatflows. This brings you to the main Chatflows page where you can see your existing chats. There are two distinct chat types: websites and Facebook Messenger.
Click the button in the top right corner that says "Create chatflow". You’ll need to choose the type of chatflow you want to create, whether for a website or for messenger.
In our case we’ll select the “website” option. From here we can choose between multiple templates separated into two types: “Live Chat” or “Bots.”
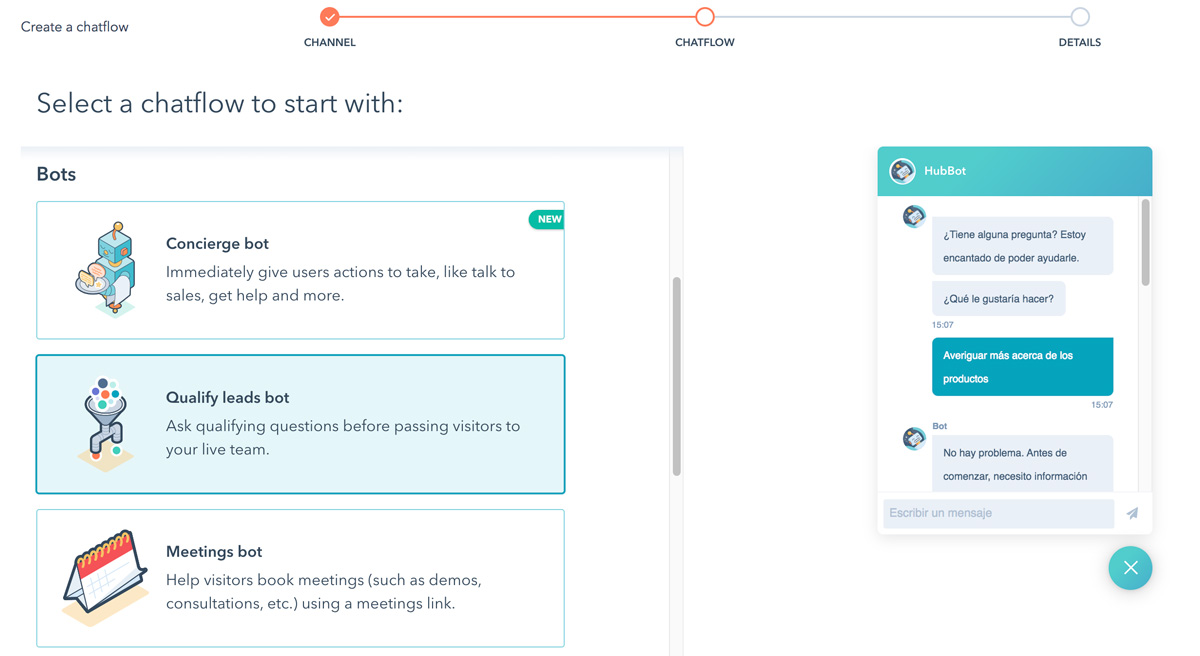
Live Chats - A live conversation where the user chats with a member of your team or a 3rd party you’ve outsourced customer care to. This can include the “Knowledge Base + Live Chat” option where users can search through your published information like FAQs and also chat directly with your team.
Bots - There are a range of different chatbots for various purposes
- Concierge Bot - Directs users to the department or information resource based on their specific requests.
- Lead Qualifying Bots - Gathers information about site visitors including how and why they’re exploring your website.
- Meeting Bot - Helps users arrange a set time/date to meet with a member of your team.
- Ticket Bot - Gathers info on visitors’ specific issues and creates a ticket for tracking their case.
- Technical Support Bot + Knowledge Base - Shares informational resources with visitors and if necessary, connects them with a team member.
- Offline bot - Guides visitors to available support to start an immediate conversation.
- It’s also possible to build your own chatbot from the ground up.
We’re creating an automated chatbot so we’ll select “Bots.” Now click ‘Next’. Here you can set up your inbox and language settings. Click ‘Create’ to finish.
2. Create Tab: Write Your Welcome Message
From here you can customize your chosen chatbot template and create a welcome message for greeting visitors.
Editing the welcome message is easy. Just click ‘Welcome Message’ in the bot template, write your custom message and click Save.
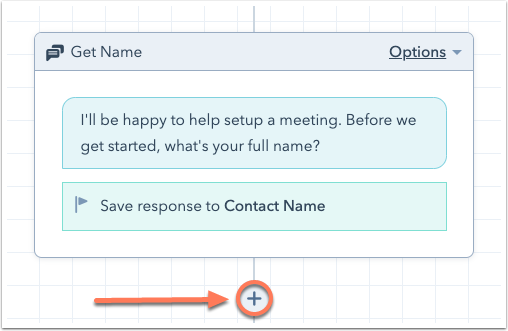
For editing a bot action or message, click ‘Action’. You then have various options for editing depending on the type of action. To add new questions or actions click on the ‘+’ icon.
To add new questions or actions, click the plus icon (+).
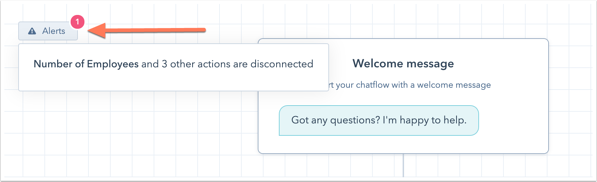
If you want to send the bot conversation to a team member, click on the ‘+’ icon and choose ‘Send to Team Member’. Sometimes when editing the bot processes, actions can become disconnected. Luckily it’s a quick fix. Just click ‘Alerts’ to refresh the flow.
Once finished, click ‘Preview’ for a sneak peek at how the bot will appear on your website. When everything’s to your liking, click ‘Save.’
3. Target Tab: Deciding When the Chatbot Should Appear
How and when your chatbot is shown to visitors can also be toggled. You can choose a specific URL to use or target visitors according to the information you’ve collected about them.
To display your chatbot when a visitor is on a certain URL go to the URL section of the website. Open the drop-down menu and select the website URL and the targeting rule, ‘contains’, for example. Now add your chosen URL in the 3rd text box. You can add more rules if you like.
To display your chatbot based on visitor information, head to the ‘Visitor Information’ section. Here you can select your preferred filters.

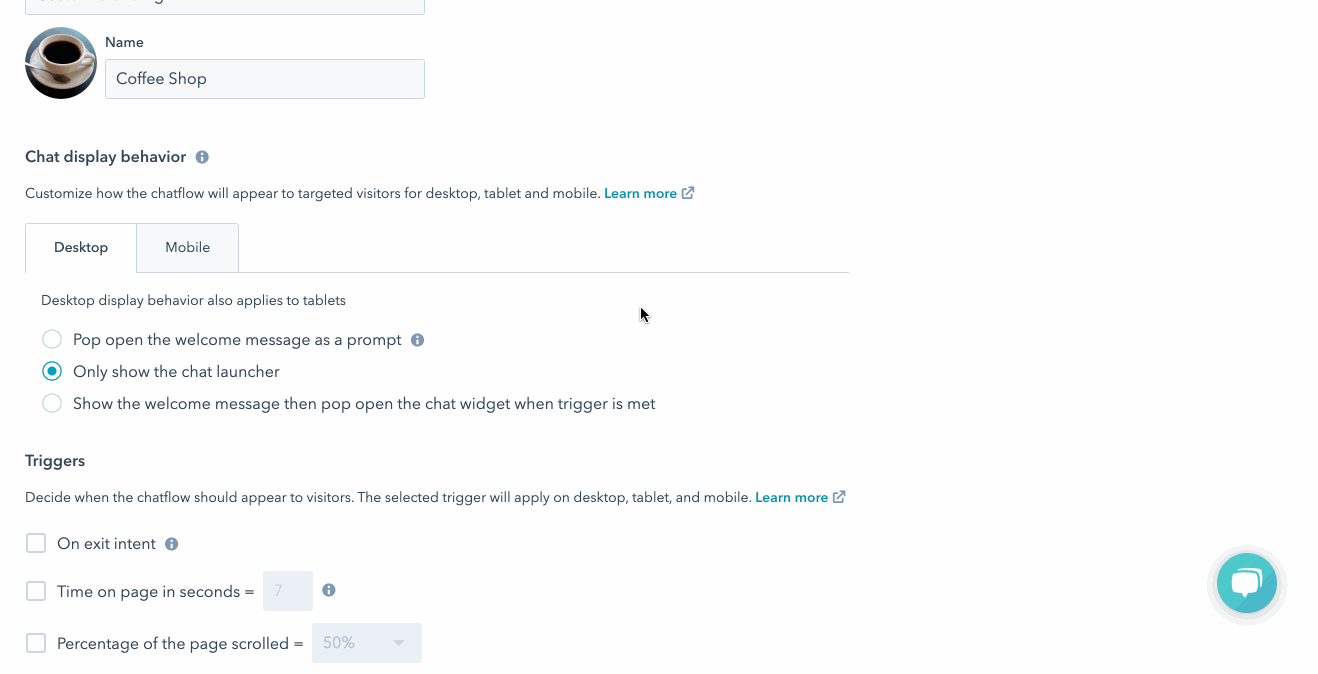
4. Display Tab: Design a Customized Appearance for Your Chatbot
This tab contains various options for modifying how your chatbot appears for visitors.
Header - Your company name that you entered for your account settings is displayed by default. You have the options to edit your avatar and your name if you wish.
Within the chat presentation section you can control the chat behavior on desktops and mobile devices. For desktops, you have the option to display the welcome message automatically. You can also just show the clickable chat button to visitors if you like. Thirdly, you can show the welcome message and have the chat pop up when an activation takes place. This third option is not available for mobile devices.
Finally, you can also choose when the chat widget loads on a given page. You have three options for doing this:
- During an exit attempt
- On a timer
- When the visitor has navigated through a certain amount of the page
5. Options Tab
In this last tab you can adjust settings for multiple options, such as:
- How much time passes before a chat restarts
- The message displayed to visitors if a request fails
- The preferred chat language
- Availability - Show the chat continuously or just when an employee is available to chat.
- Cookie Consent Text - Decide if your cookie consent options are shown before a chat starts or when exiting the chat.
- To activate visitor consent for processing their data
- Selecting the type of consent
- Activating marketing contacts which stores contacts created within the chatbot, which are then stored in HubSpot
And there you have it, our step-by-step guide to creating a chatbot in Hubspot’s Chatflows. As you can see, there are tons of options for customizing chatbots using the chatbot builder to develop a more engaging experience and provide automated customer service you’re actually proud of.

Helena Alcoverro
Inbound Marketing Strategist at Cyberclick. Helena holds a degree in Advertising and Public Relations from UPF. She specializes in inbound marketing campaigns, digital content creation and web positioning, with experience in CRM management and HubSpot.
![HubSpot Marketing Hub Tutorial [video included]](https://www.cyberclick.net/hubfs/blog/Copia%20de%20How%20To%20Use%20YouTube%20Video%20Builder.jpg)

Leave your comment and join the conversation